Showing posts with label How to.... Show all posts

Saturday, 4 June 2022

HOW TO BLOCK SOFTWARES FROM ACCESSING THE INTERNET ON YOUR PC

Hi guys! 

In today's article I'd be sharing with you; How to block softwares from accessing the internet (Deny Internet Connection).


I know it's sounds weird ("like why would I want to do that?" Trust me, it's needed at some point (couple of friends reached out asking this and I also do it--when I have low data balance and need to avoid softwares that would download update automatically or maybe I'm busing and I don't want distractions from several softwares)

(Okay! Let's jump right into it!) Cool stuff, you don't even need a third-party software.

Follow the steps below to block software, (I'm running on Windows 10 here but you could follow same process for other window versions);

  1.  Open/Click "Start Menu" and search "firewall"
  2.  Select "Window Defender Firewall"
  3.  Select "Advanced settings" from the left corner

block softwares from accessing the internet1

4. Select "Inbound Rule" from the left corner and "New Rule" from the "Actions Tab" at the right corner.
block softwares from accessing the internet2
5. From "New Inbound Rule Wizard" Select "Program"
6. Browse the software - make sure to select the executable/application file (.exe)
block softwares from accessing the internet3


7. After selecting "Next" Select "Block the connection" and select "Next"

block softwares from accessing the internet4


8. On the next page make sure all options are checked (Domain, Private & Public) and select "Next"
9. Enter Name and Description (optional)
block softwares from accessing the internet5

You are done but you have to do same for "Outbound Rules"

1. Select "Outbound Rule" from the left corner and "New Rule" from the "Actions Tab" at the right corner.
2. From "New Outbound Rule Wizard" Select "Program"
3. Browse the software - make sure to select the executable/application file (.exe)

block softwares from accessing the internet6

4. After selecting "Next" Select "Block the connection" and select "Next"
block softwares from accessing the internet7

4. On the next page make sure all options are checked (Domain, Private & Public) and select "Next"
5. Enter Name and Description (optional)
block softwares from accessing the internet8


Share:

Sunday, 10 April 2022

HOW TO PARTITION YOUR HARD DRIVE/DISK (Windows-based)

Hi guys! Today We'll be talking about one of the powerful and useful features of Windows, PARTITION. 

Today I'll explain and walk you through

  • what partitioning is
  • why you should partition your disk/drive
  • how you can partition your disk/drive with an inbuilt Windows tool, NO THIRD PARTY APPLICATION is required. 

What's Partition/Partitioning?

It's an act or result of dividing into parts (partitions); an arrangement of partitions.

More explicitly, it involves diving your computer's hard disk or drive into two or more unique parts (more like dividing an office space for two individuals, clear?)

Disk partitioning is also called Disk slicing.

Click here to read more.

Why partition?

As explained above, Partitions enable users to divide a physical disk into logical sections. So, partitioning your disk comes with a lot of merits (over demerits). 

Below are a few;

1. Allowing multiple operating systems to run on the same device (Linux, Windows...) or multiple versions of an OS (say, Windows 7, 8, 10, 11) on the same device.

2. Speed: Keeping your Windows system files separate from personal files makes it easy to perform operations on Windows itself.

3. Reinstallation Ease: It's a lot easier to reinstall Windows when it's on a separate partition. All you have to do is format your Windows partition and reinstall the OS. Your installed programs and files will stay where you left them.

4. Multiple files systems: If you own a Windows-based PC and a Mac-based PC but you've got only one drive (most likely, external), you could partition your drive into two parts; one in NFTS (file system) - which is readable and writable for Windows and the other as APFS - which is compatible with Mac OS (FAT32 and exFAT are compatible for both Windows and Mac OS).

5. Other benefits include simpler backups and improved security among others. 

Click here to read more on merits

HOW TO PARTITION YOUR DRIVE

1. Open Disk Management  - you could search "Disk Manager" in the search bar and select “create and format hard disk partitions” 

2 Hopefully you would have no partitions yet (unlike the image below, SAFE is a partition). Find your C drive and left-click on it then, select “Shrink Volume”

How to partition an hard disk/drive 1

 3. On the next page, some space will be allocated for the NEW VOLUME/PARTITION however, you could enter your desired amount of space for the partition to be made, I created 199MB (or 200MB if you will) for this tutorial.

How to partition an hard disk/drive 2


4. After the window closes, find the volume labeled “Unallocated”, left-click on and select “New Simple Volume”

5. "New Volume Wizard" opens up to guide you through the process 

How to partition an hard disk/drive 3


6. On the page shown above; it is advisable to select “format the volume….”, select “Perform a quick format”, Choose an appropriate File system and Label the volume (though you could rename the volume after the process) 

How to partition an hard disk/drive 4
On completing the process, your new partition should be up as shown below;How to partition an hard disk/drive 5


Share:

Thursday, 8 August 2019

How To Read Deleted WhatsApp Messages


Hello guys! Welcome back to Mygist blog, we want to use this medium to say a “BIG-THANK-YOU” to you for staying with us, we really appreciate y’all!


Yeah! Let’s get back to today’s business, we know how excited you get when you find out that someone deleted a message (especially someone real close), you just want to know; so today’s article is all about that: a trick to view whatsApp deleted messages!


It’s quite easy and simple. Here we go!!!


So, to do this you wanna download and install “NOTISAVE” from Playstore.


1. After installation, open “Notisave” after loading, a notification will come up asking if you want “Notisave to access notifications” click on “allow”. Then check for “Notisave” in the apk list and mark it: to give it access.


2. Then, back to Notisave (with access already granted)


Now you read all deleted whatsApp messages on Notisave


Credits: Team_Bot & TECONZ

Share:

Wednesday, 22 May 2019

How To Monetize Your Website (Part 1)


Hello guys, welcome back to Mygist Blog, Today I wanna share with you “How to monetize your website/blog” in case you’re wondering what I mean by “monetizing”-to earn (to make money) on your website/blog. There are many methods of monetizing your website/blog, but in this article I’ll be writing specifically about Google Adsense (on blogs), trust me it’s one of the coolest way to earn on your website/ blog, follow the steps below and you’ll soon be rejoicing……..Tada!!!


Click on the link above, and then click on sign up- to create an account or sign in-if you have an account already.


  •    Input your Email address.
  •     Tick “Yes” for “Get helpful adsense information @ email, if you want to receive info in your mail box and then click on “Save and continue”
·    
Click on the link above, and then click sign in or sign up- to create an account.


  • ·   Click on “Earnings” from the list of options.
Since you used the same mail address for both blogger and blogger, then all you need to do is to input your mail and password and you are done!
If you are using different mails, it is not impossible nor stressful too, all you need to do is to sign in to your google adsense account


  • ·    Go to “settings” and select “Account Information”
  •    Then copy your “Publisher ID”, Go back to blogger, paste it.
  •  ·      Make sure you tick “yes” from the “show ads on blog” option.
I will be writing an article soon on “How you can Google Adsense Fast Approval!

If you just created your google adsense account, you should know that your account will be reviewed by google adsense engineers, this take about 48 hours/2weeks or even more depending on your location, blog traffic: number of people that visits your blog, you should have about 500 views, and more.
So, you should keep checking your goggle adsense account until it is verified (you will be notified if it is), then ads can start appearing on your website/blog.


Do you have any questions?
Do you have another method of doing this?
What are your challenges while doing this?
Does this work for you?
What would you like to read next?
Feel free to use the comment button below!
And of course, don’t forget to share- Tell a friend to tell a friend, you never can tell you might be saving a soul!!!
Thanks for reading!!!

Share:

Thursday, 16 May 2019

JAMB 2019: Result Checker Portal Activated - Check Yours Online!

This is to inform all jambites, that the long-awaited moment is finally here! We have confirmed this yesterday and have successfully verified it. Many candidates have already checked their results on JAMB's online portal. If you have not been able to check yours via the Text/SMS method, you can proceed to the board's website now to check yours.


 Also candidates who have checked theirs via the Text/SMS method can equally confirm their results online now.


How To Check Your 2019 JAMB Result Online


Candidates are to visit: https://www.jamb.org.ng/ExamSlipPrinting3/CheckUTMEResults

Enter your JAMB Registration Number or email in the space provided
Click on "Check My Result" and proceed to view your results
Goodluck!
Share:

Monday, 1 October 2018

How To Unlock/Bypass CM Locker And Other Lockers (Apk)

Have you forgotten your password?
Have you tried, and tried and tried?
Did someone tried to unlock your android and ended up locking it?
Do you really need that android back without been erased/wiped?

What if i tell you that there is a solution without wiping your phone.

 stay calm!........and read this article!!!

Recently, i wrote an article about "Safe mode", if you haven't read that, then you really should do that now before this tutorial!

I guess you've read that now!

Today, I'll be sharing an important function of safe mode, that is, how to bypass/unlock Cm locker and other lockers via safe mode!

Now lets go through the steps:
1. Boot your locked device into safe mode......click here to learn how to do this!
2. Get to "settings":
Once your device is in safe mode, the lock won't show up. But in some cases(androids) it might, if it does then you won't be able to draw any pattern or input any pin/password. All you need to do is to find a way to get to  "settings"; In most android you might just slide the notification panel down and click "settings"
3. Go to "Applications/Apps"


The "Application/Apps" (some androids have applications, while  some have "Apps". Any one you find) gives you access to all applications installed on your device.
4. Find the Locker (Cm Locker in this tutorial):


When you see the locker, click on it, then click on uninstall: to remove the apk or "Clear Data": to remove the locker's files(pin/pattern/password) and keep the apk.
4. Turn off system
As you know that a simple reboot will turn off safe mode

After restart, lock is gone

Note: This trick does not work for phone lock (Phone/System Security). Only for installed lockers like Cm locker, AppLock and many more!

Do you find this article helpful?
Please Share!

Do you have any trouble doing this?
Do you have/know another way of doing this?
Do you Want to tell us how helpful this was?
What would you like to read next?

USE THE COMMENT TAG BELOW!
Share:

How To Turn Off (Disable) Safe Mode On Android

Hello guys, welcome back to Mygist Blog. My last article was "How To Boot An Android Device Into (Turn On) Safe Mode ", so i felt i should talk about " How To Turn Off (Disable) Safe Mode On An Android Device" —To bring your device back to its normal mode! Since I didn't include it.


The process for booting your phone into Safe mode can vary a little between different Android devices, but getting out of Safe mode is always the same.


Here’s how to do it.

1. Press and hold the Power button.
2. Tap the Restart option.

That’s it. A simple restart of your Android device will turn off Safe mode.
Share:

How To Boot An Android Device Into Safe Mode

I want to use this medium to say "Happy New Month & Happy Independence Day To My Fellow Nigerians!"


Today's article teaches you about safe mood and how you can boot your android into safe mode.
I'm sure you've heard about "Safe Mode" before! and if you haven't, you are in the best place to learn about what its means!

So, What is "Safe Mode"?


Safe Mode is a tool for troubleshooting: When you boot your device into safe mood all third-party  applications installed won't run on the device, that is, all downloaded apps won't run, only the system apps will run.

Safe mode can help you to track down the causes of problems you may be having with your device. If your android device is overheating, drains battery quickly, slow or not performing operations properly— and do not exhibit these troubles  while in safe mode—then you know that an application you installed is the cause.


The process for booting your phone into Safe mode can vary a little between different Android devices.

Here’s how to do it.

1. Press and hold the Power button.
2.Tap and hold Power off.
3. When the Reboot to safe mode prompt appears, tap OK.


Your device will then restart and it will say “Safe mode” in the bottom-left corner. This method works for LG, HTC, Sony, Techno, Infinix, Samsung, Gionee, Itiel, Lenovo, and many other Android phones.


Do you find this article helpful?
Please Share!

Do you have any trouble doing this?
Do you have/know another way of doing this?
Do you Want to tell us how helpful this was?
What would you like to read next?

USE THE COMMENT BUTTON BELOW!
Share:

Saturday, 7 July 2018

How To Download Facebook Videos

Hello guys, welcome back to mygist blog. Today's article teaches you "how to download facebook video on your device" many people don't know that you can really download facebook videos, well they think its just to watch unlike the pictures that you can easily save, but i'll show you how to this in two different step.


Step 1: Using Vidmate

Video fans around the world love this application because it does a lot, like; download YouTube videos, save WhatsApp status, download movies, songs  and many more!

Wanna see how to download YouTube videos with vidmate?

Wanna see how to save WhatsApp status with vidmate?

Now lets do this!

1.  Download and install vidmate from Playstore.
2. Go to Facebook, select the video you want to download.
3. Copy the video link. check here to see how to do this!
4. A "Download Icon " will pop up.[ as in the picture above]
5. Click on it to start download

In case, you copied the video link and the "download icon" didn't pop up, you don't have to worry (Mygist blog gat you!) The alternative method below  is for you!

Alternative Method:


1. Download and install vidmate from Playstore.
2. Go to Facebook, then copy the video link. check here to see how to do this!
3. Now, launch vidmate, paste the link, then click search
4. After few seconds, the result will be displayed, then select and download

Step 2:  Facebook Downloader
Facebook Downloader

1. Download Facebook Downloader apk from playstore.
2. Enter your account details(Username/Mobile number and password) to log in.
3. Select the video you want to download
4. Then click "Download" to save it.


  • Do you find this helpful?

Please Share!


  • Do you have any trouble doing this?
  • Do you have/know another way of doing this?
  • Do you Want to tell us how helpful this was?
  • What would you like to read next?


USE THE COMMENT BOX BELOW!.......IT'S YOURS!!!
Share:

How To Save WhatsApp Status With VidMate(No Data)

Hello guys, i'm back again with another interesting vidmate tutorial. Couples of month ago, i wrote an article on "How To Save WhatsApp Status Without Screenshot(Screen Recorder) Or Data", you might want to check that!


Today, I'll be doing the same thing,  but now I'll be using vidmate.
Follow the steps below;
1. Of course you know you have to get 'Vidmate' apk
2. Launch Vidmate
3. Click on "WhatsApp Status Saver"


4. Select the video you want to save
5. Click on "save"


Do you find this helpful?
Please Share!

Do you have any trouble doing this?
Do you have/know another way of doing this?
Do you Want to tell us how helpful this was?
What would you like to read next?

USE THE COMMENT BOX BELOW!....IT'S YOURS!!!
Share:

How To Get/Copy Facebook Video's Link And Picture

Do you want to download a Facebook video?

A Facebook video link helps you to find the video and download it; It's like a directory(where it is saved)

The steps below will help you to copy a videos link
1. Log in to facebook
2. Find the video you what to download.
3. Click on "option"- the 3-dots
4. Select "Copy link" from the option


Do you find this helpful?


Please Share!


Do you have any trouble doing this?
Do you have/know another way of doing this?
Do you Want to tell us how helpful this was?
What would you like to read next?


USE THE COMMENT BOX BELOW!.......IT'S YOURS!!!
Share:

How To Download YouTube Videos On Vidmate

Hello guys,this article teaches "how to download YouTube videos". Well i know this is weird because majority seeing this must have heard/know about it already!
i'm writing this for the minority out there!

Now lets just go through the steps;
They're easy ones anyway
1. Download Vidmate apk from play store
2. Launch Vidmate
3. Click on the search space and type any keyword. Example: "How to dance", "Man u Vs Madrid highlight", "Bleeding Steel".
4. Wait for search results
5. Now, select the video you want to download
Sometimes i'd watch for a while to see if its really what am looking for!, you might want to do that too, to see if the video is relevant, so as to avoid wasting data
6. Since you now know what you what to download, click 'Download' to dowload
7. Select the format. E.g: Mp3, Mp4, HD


Do you find this helpful?


Please Share!


Do you have any trouble doing this?
Do you have/know another way of doing this?
Do you Want to tell us how helpful this was?
What would you like to read next?


USE THE COMMENT BOX BELOW!.......IT'S YOURS!!!
Share:

Friday, 18 May 2018

How To Download Webpage As PDF

   This article teaches you how to download a webpage in  PDF format.

Stay calm and read this

After many trials, the only browser i could do this with was "Mozilla Firefox", well I'm not saying that only Firefox can do this, Hopefully other browsers might, or perhaps only Firefox. So you will have to get Firefox apk from play store or other source.

Alright, Lets do this!, now that we have installed Firefox

1. Launch Mozilla Firefox.

2. Open the webpage you want to download.

3. Click on the "Option Icon"; the 3 dots located at the right top of the screen.


4. Select "Page", then a new window will pop-up.
From the new window select "Save As Pdf", then wait for few seconds for your download to be completed, after the download is been completed, you can now open the pdf file with any pdf readers(such as "Adobe reader", "Wps", "Quick office" and many more).


Is there another way you do this?
why dont you share it with us?
Do you want to share your experience(if it worked or it didn't)
Use the comment box below
And of course, don't forget to share!
Tell a friend to tell a friend!!!

Credit:
All writing and pictures credit goes to Taiwo David

Share:

Monday, 14 May 2018

How To Convert Video To Audio On Android

  Hello guys, It's been a while, welcome back to mygist blog. Today I'll be sharing a cool trick with you guys; how to convert video to audio.

"Stay calm and read this!"

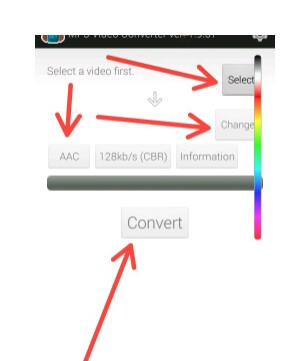
1. Download "Mp3 Video Converter" Apk.
Mp3 Video Converter is a program developed to convert a video file into an audio file. You can download "Mp3 Video Converter" on play store.

2. Launch Mp3 Video Converter.
After installing the apk file, launch the app.


3. Select The Video File You Want To Convert.
Click on "Select" and select the video file you want to convert.

4. Optional
Click "Change" to rename the file(Audio), click "Information" to add more information like artist, album and title. Select between "ACC" or "MP3".
(Any of the two will work, it just determine the file and its extension)

5. Convert
Click on "Convert" and wait for few minutes, once your conversion is completed you are good to go!

Share:

Tuesday, 10 April 2018

How To Make WhatsApp Head Chat

Do you really like Facebook messenger's head chats that you wish your WhatsApp or any other applications  could also be the same(with head chats)?    I'm glad to tell you that your days of wishing is now over!

Stay calm and follow the steps below;

1. Download "Notfly" application on Google Playstore or here.

2. Allow System Overlay and Notification Access


3. Click on "Try" Button and You can see a sample chat head then click on "DONE".


4.  Then select applications that want to show chat head notification.


Now you will get WhatsApp, Telegram, Gmail Notifications in Chat Head


Do you have another way you do this?
Do you have any questions?
Then, make use of the comment box below!
And of course, don't forget to share this with your friends!
Share:

Monday, 2 April 2018

How To Upload Long Videos On Your WhatsApp Status

   Hello guys, welcome back to my blog, Today I'll be sharing a very useful trick for many people who find it difficult to upload long videos on WhatsApp status since videos sent to status will be trimmed to Thirty Seconds.

   This is very easy and its done by using a third party application called Whats Cut Pro.

                        "Let's Do This"


Follow the below steps to post long videos on WhatsApp

1.Download and install whats cut pro application from play store
Click here to download
2.Open Whats cut pro and select your video
3.Now select the length and click on the green icon
4.Then it will be redirected to WhatsApp and select "My status" then click tick icon


Now your long videos are posted on WhatsApp status.
Don't Forget To Share!!!
Share:

Wednesday, 28 March 2018

How To Untag Yourself From Facebook Photos/Post

  Well I'm back again and I'll be sharing another simple trick "How to untag yourself from Facebook photos/post"
If you want to delete your own photos/posts[clear your Facebook data] you may still be tagged in photos that someone else has posted, or you don't want someone else post/photo on your timeline. For these, you’ll have to remove your tag from each one to be set free.


1. Go to your activity log
2. Click "Photos and Videos"
3. Then choose photos and videos you’re tagged in
4. Click "Options" [The 3-dot to the right of the posts you’d like to remove a tag from]
5. Select "Remove Tags" if you don't want to be tagged in the post anymore.
6. Select "Hide from timeline" if you don't want the post to be viewed on your timeline"
7. Then select "confirm"


Share:

How To Delete Facebook Photo Album

  Hello guys, In my previous post, I shared "how to delete Facebook photos/posts" and now I'm sharing another simple trick "how to delete Facebook photo album". Stay calm and read this care.

This process is fairly quick and painless (depending on how many albums you may have) because removing the album itself removes all the photos within the album.

1. Go to your Photos page and click on Albums.
2. Go to the album you want to delete
3. Click the gear on the top right
4. Select "Delete Album"
5. Click to confirm

Share:

How To Delete Facebook Posts/Photos

  Hello friends, welcome back to my
site. In today's article i'm going to share a simple trick that is "how to delete facebook posts/photos" well this is a very simple trick but i discovered that some people don't still know how to do this, so i have decided to share this!

"If you've been facing this trouble then stay calm and read the instructions below--This post is for you"


1. Log in to your Facebook account
2. Go to your profile,locate the particular post/photo you want to delete.
3. Then click on "Option"[The 3-dot
above the post/photo]
4. Select "Delete" from the drop-down menu that will appear
5. A message will pop-up asking if you really want to delete the post/photo
Click on "Delete Post" and the post is gone!
Don't forget to share!
Share:

Saturday, 17 March 2018

How To Make Your Pictures Private On Facebook

  This post teaches you how to prevent others from seeing a photo or album of yours on Facebook.
*Keep in mind that you cannot edit the privacy options for photos, videos, and albums that you didn't upload to your profile.*

Method One Of Two

How To Make A Single Picture Private


1. Go to Facebook or launch Facebook application on your device. This will open your News Feed if you're logged into Facebook.

*If you aren't logged into Facebook, enter your email address and password to do so.*

2. Go to your profile. Click your name in the top-right side of the Facebook page.
 3. Click on the "Photos" tab.
4. Select a photo category. Click a category tab (e.g., Your Photos ) near the top of the page.
5. Select a photo. Click a photo that you want to make private. This will open the photo.
*The photo must be one that you uploaded, not just one of you that someone else uploaded.*
6. Click the "Privacy" icon. This icon generally resembles a silhouette of a person (or two people) that you'll find below and to the right of your name in the upper-right side of the photo. A drop-down menu will appear.
*If clicking this icon results in a menu that says Edit Post Privacy , click Edit Post Privacy to go to the post, then click the privacy icon at the top of the post before continuing.*

7. Click on "Only Me" . This option is in the expanded drop-down menu. Doing so will immediately change your photo's privacy so that only you can see it.


Method Two Of Two:

Making an Album Private

1. Open Facebook in your browser/ Launch Facebook application on your device. This will open your News Feed if you're logged into Facebook.
*If you aren't logged into Facebook, enter your email address and password to do so.*
2. Go to your profile. Click your name in the top-right side of the Facebook page.
3. Click on the "Photos" tab. You'll find this below the cover photo that's at the top of your Facebook page.
4. Click on the "Album" tab. It's in the upper-right side of the "Photos" page. This will open a list of photo albums that are on your Facebook profile.
5. Find an album that you want to make private.
*Some Facebook albums are built into the Facebook website, and thus cannot be made private.
The "Mobile Uploads" album (or the "iOS Photos" album for older uploads from an Apple phone) cannot have its privacy edited.*
6. Click the "Privacy" icon. This icon generally resembles a silhouette of a person (or two people) that you'll find below and to the right of your name in the upper-right side of the photo. A drop-down menu will appear.
*If clicking this icon results in a menu that says Edit Post Privacy , click Edit Post Privacy to go to the post, then click the privacy icon at the top of the post before continuing.
Click More… . It's in the drop-down menu.*
7. Click Only Me . This option is in the expanded drop-down menu. Doing so will immediately change your photo's privacy so that only you can see it.

Share: